

Kick and Glide tells you how to roast the perfect chicken.
Roast chicken is my favourite comfort food. The oven warms the house and the smell warms my heart. It makes the whole house smell heavenly. I like the prep and especially the anticipation of sitting down to dinner.
Roast chicken is not fast food, but it is fairly easy. Here’s my approach to roasting a chicken that will save you time and money and give you oodles of flavour. The key is planning.
Chicken Facts
First, get your chicken. There are three broad cost levels you can choose from depending on your budget. If you live in Edmonton, Supermarket chicken, in this case Safeway, is about $7.79 per Kg., $6.79 for a package of two. Or Costco, on Feb 6, was asking 5.39 per kg for a package of three. ACME meats on 76 Ave. at 96 St., sells Viking Hutterite chicken for $8.00 a Kg. Sunworks Farm at the Saturday Strathcona Market or at Blush on Whyte, sells free-range birds for $12.99 per Kg. The difference in the price matches the difference in flavour. I prefer Sunworks chicken – but I can’t always afford it. Although, as you will see, if you cost it out per meal, even if you go high end, you are still eating for way less than you can in a restaurant.
Washing – the debate
There is a growing debate on the internet as to whether we should wash the bird or not. Here is the argument. Uncooked chicken juices can transmit bacteria and some suggest you wash the bird before roasting. But, if you wash the bird in the kitchen sink you are apt to splash its juices all over the place. And then you have to clean up around the sink and everything else the chicken has come in contact with. You can never be sure that you have gotten everything.
The alternative is simple. Don’t wash the raw bird at all. Simply proceed to the next step, marinating. Remember, you have to cook it to the required internal temperature anyway to kill any pathogens. If you skip washing you save the juices, save the time and avoid the risk of contaminating the kitchen.
Impress your friends and family!
Marinating
Marinating allows you to add flavour and have your bird ready to go into the oven when you need it. You can marinate for two days if you wish, but even an hour will improve the outcome. This step is easy and there are a lot of ways to do it. My favourite is called Rosemary Chicken with Lemon. Put the chicken in a large bowl. I start with the juice of one or two lemons, which I rub all over the bird, inside and out. Then you do the same thing with a tablespoon of olive oil, a big clove of garlic, two tbs. of finely chopped fresh rosemary, one tbs. if dry, a small dash of salt, a generous grind of pepper and the zest of the lemon. Last step, stuff the lemon rinds in the cavity. Have everything prepared and ready to go into the bird. That way you won’t be touching the bird and then touching cupboard doors, fridge door handle, phone, etc. Finish by washing your work area and wash your hands carefully. Cover the bowl containing the chicken and refrigerate until you are ready to cook.
Stuff & Nonsense
To stuff, or not to stuff, that is the question. Stuffing the bird is added work: it increases your cooking time, adds calories to the dish and compromises an even cooking temperature inside the bird. The bigger the bird, the greater the risk of having burnt wings and pink inner thighs.
Trussing? Forget it. It compacts the thigh against the body making it near impossible to cook the inner thigh without drying out the breast. A compromise is to put flavourful things in the cavity, such as half an onion, a stick of celery, a carrot, a clove of garlic, fresh ground pepper, a pinch of salt and sprigs of fresh thyme. Follow the flavours of your marinade. Just put things in loosely, don’t cram the cavity.
Cooking Facts
Finally, we get down to actually cooking and this is where I’ve turned to the pros. Cook’s Illustrated magazine runs testing labs and publishes their results in weighty tombs like The Best Recipe. They roasted fourteen hens every which way and decided the following gave them the best results. I’ve tried their techniques. They work.
First, don’t put your bird into the oven straight out of the fridge. Give it a half hour on the counter while the oven is warming to 375°F (190 C). While waiting for your oven to reach cooking temperature slip the cooking pan into the oven to pre-warm the pan. A cold bird in a cold pan will cook unevenly and alter your cooking time.

NO!
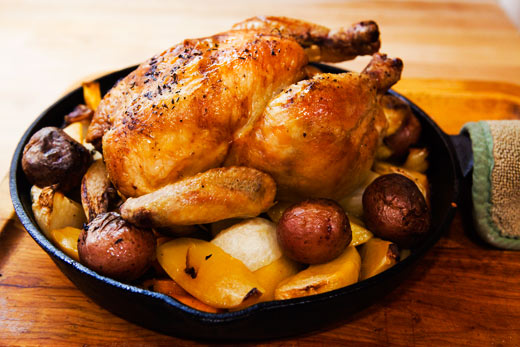
Next, using oven mitts, (Duh!) take the hot roasting pan out of the oven, place an oiled V rack into the pan and place the chicken wing side down. Roast for 15 minutes then turn the chicken over onto its other wing side for another 15 minutes. Turn the oven up to 450° F (232 C), rotate the chicken breast side up and cook for another 25 minutes. This method allows you to skip basting, which opens the oven door and lowers the temperature.
Forget that old-school method of testing for doneness, i.e. sticking a skewer into the breast and seeing if the juices run clear. Despite what your granny may have said, this method is not reliable. Get yourself a digital immersion thermometer and take the guess-work out of this crucial stage in the cooking process. Every kitchen should have one.
The pro’s at Cook’s Illustrated found that the brown meat was cooked at 165° F to 170°F (74 to 77 C)—that’s why we turned the bird—and the white breast meat was cooked and still moist, at 160°F (71 C). The crucial temperature you should test for using your new digital immersion thermometer is the higher of the two, the inner thigh. Stick the thermometer into the inside of the thickest part of the thigh, parallel to the body. Avoid hitting the bone, or going into the body cavity. The timer on the stove has gone off, the temperature reading is above 165°F (74 C) and chicken is cooked and smelling gorgeous.
Tenting
When the bird comes out of the oven allow about ten minutes for the bird to rest – this will allow the juices to spread evenly. Place the bird on a warm plate and slip it into a brown paper bag. Or wrap the chicken in foil. If you don’t have anything else, use newspaper. The juices will settle and the meat will be moist and even more flavourful as a result. Also the juices won’t run out of the meat as you are carving it.

Never Swiss Chalet!
Eating
If you have hungry teen-agers who will eat the whole chicken in one sitting, or roommates who will sneak down in the dead of night to pick at the remains, carve yourself enough for a chicken sandwich the next day. Wrap and hide your sandwich meat in under the lettuce. Cook’s privilege.
Stock Options
When the chicken has been eaten to the bone, save and freeze the remaining bits and pieces. Then you can use these to make a stock. No, it’s not a lot of work. It’s easy.
If you are eating with friends and family, rescue the picked over drumsticks and add them to the stripped done carcass. Anything that went into your marinade can be added to the stockpot. After simmering for an hour you can use your stock for broth (strain and add rice or noodles or just chopped parsley or chives). Or this stock can be used to make other soups, risotto, quinoa pilaf, casseroles – the list is endless. These homemade stocks are much more healthy and flavourful than the over salted, unknown ingredients in the never-go-bad concoctions that grocery stores sell you. Freeze some fresh stock for future use.
The Golden Disk
Have you been asking, “Where’s the gravy?” Bear with me, the best is yet to come. On the night you roasted the chicken, what did you do with the roasting pan? What follows is just one reason I skip gravy. Save the roasting juices for better things. You do that by deglazing the roasting pan. You don’t have to do it the night of. Cover it well and put it in the fridge or the garage, or anyplace the magpies can’t get at it. But rescue the pan! And rescue the roasting juices!
Now, when you are ready to deglaze the pan, put it over two stove elements, if it will fit. Turn the elements on low and slowly reheat the pan drippings. Add about half a cup of boiling water and slowly scrape and loosen the baked on bits using a stiff spatula. Turn the pan end for end and keep it moving. Add a little sherry to help dissolve the crusty bits. For god’s sake, don’t use “cooking sherry” from the grocery store; it’s total crap. Use an inexpensive sherry, from Spain, such as a medium sweet “Nutty Solera” bottled by Gonzalez Byass. Slowly build up your drippings, adding a little boiling water, a splash of sherry, or left over wine from your last party. This process, this panning for gold, takes about ten minutes.
When you decide that you have gotten all that can be recovered, pour off the pan juices into a flat bottom bowl. Cover and store in the fridge.The fat will separate from the liquid forming a firm thick layer. This top layer of fat will shield the under layer from spoilage and oxidation. Meanwhile the under layer forms a firm jelly, loaded with umami flavour, which can be used in minestrone soup, Basque mushrooms on toast, or added back into your stock for added oomph. (See Kick & Glide, Use Umami to Cut Sugar…). I call this little beauty the golden disk. It will keep refrigerated for over a week and it is easily separated from the fat.
You have now “milked” a chicken. You’ve gotten good meals. You’ve got stock and jelly (the cream) for your next culinary adventure, which you can plan while enjoying your roasted chicken sandwich. What a perfect little world.
